So you probably guessed that this post refers to the magic of spray paint, and although this is not a new idea, the outcome is still pretty great.
We were given an old mirror from my hubby's nana which used to hang over the fireplace in her old house. This mirror is solid wood and HEAVY. It was also painted with a gold finish. Not really our style, but the mirror has an interesting shape and some beautiful detail.
I painted it using Gloss Dark Espresso which gave it a beautiful dark gloss finish and definitely made it look more modern.
I think every time I spray paint something I have a "wow moment" where I can't believe that it worked again. Spray paint is magical and if you haven't tried it yet, you must.
Now I just have to convince hubby to help me hang it. The thing weighs a ton! I think I'm going to get to use the stud finder. I love that thing. I have a weird thing for tools. Maybe I'll make some cookies... that ought to do the trick.
Showing posts with label wall decor. Show all posts
June 4, 2011
May 16, 2011
Free Monogram Art
I love monograms. My new (married) initial is H and it makes a great monogram, either lovely and scrolly or strong and straight. Love it.
You may have noticed the blank wall space in the front hallway from the after photos (on the far side of the mirror beside the front door).
A bet you were wondering what I was going to put there. Or if you weren't before, hopefully you are now. I decided to use one of my pretty empty thrift store frames to create some custom monogram art for $0. That's right free.
Using this "junk"
I created this beautiful artwork.
This is something that anyone can do. All you really need is scissors, some paper and some paint.
Here's how I did it.
First you need to find a monogram that you like and print it out. I used a custom font that I found online, but you could use anything from Word or even draw it yourself.
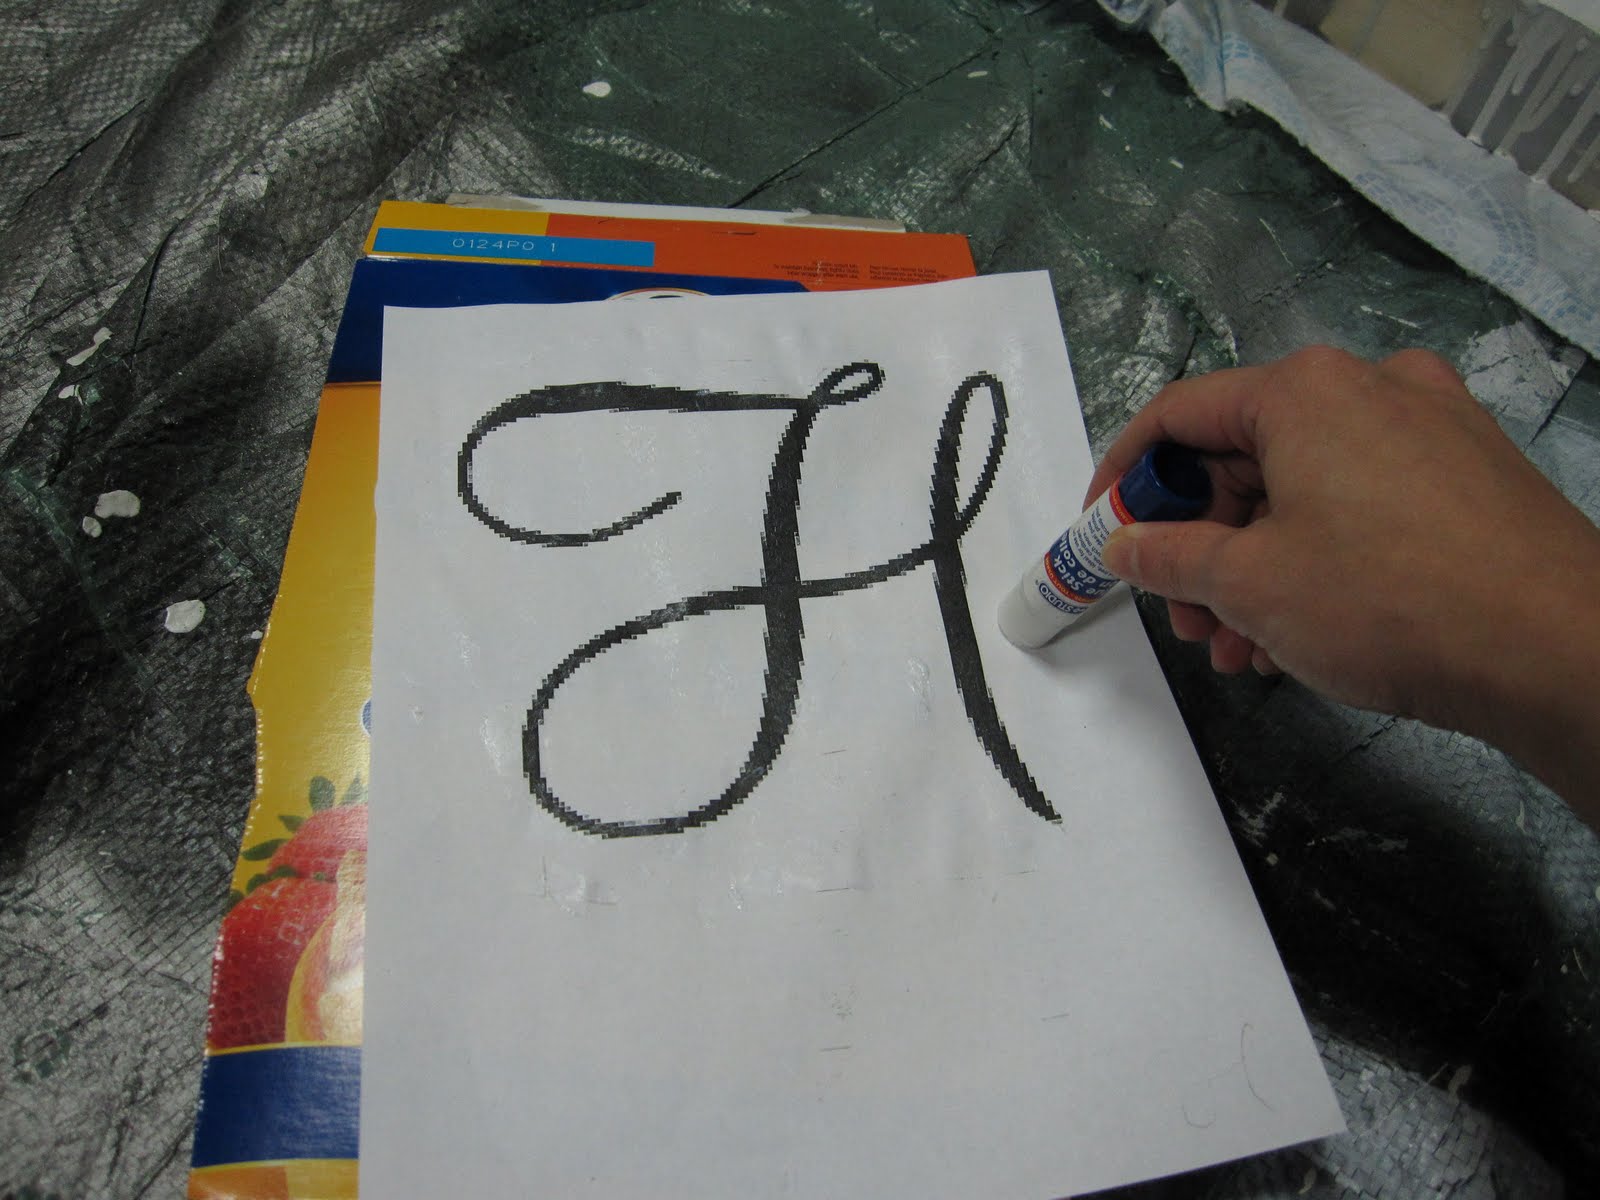
Next you glue the print-out to the side of a cereal box (or some other stiff paper)
Next you're going to cut out the letter.
This is more difficult the more swirly the letter, also my dollar store glue didn't stick that well and I had a bit of sliding around.but eventually you'll get something like this. Notice that I have separated the template from the cut-out letter ("cut-out"). If your glue is not too sticky like mine this is easy, if you have good glue you can just print 2 templates or photocopy a duplicate. You'll need this for the next step.
Now you'll need to cut out the loops. You can use an exacto knife and cut them out of the "cut-out", but its easier to cut them separately and gives a nice 3D effect at the end. When you're done you should have pieces like this.
Next we're going to cut out the background. I used a cardboard box and cut it to fit inside the frame so that it looked like this.
Now we're going to paint everything. I applied primer to all of the pieces.
And it got a bit messy.
Especially after I accidentally put my hand on the primer can lid while standing up... sigh.
Once everything is primed you can paint the pieces in whatever colours you like. I used the front hall wall colour for the background, trim white for the frame, white gloss for the "mat" and the "loops" and oil rubbed bronze for the "H". All colours I already had on hand. Once everything is painted you just have to assemble it. I used a glue gun for this for better hold. If any of your pieces curve a bit from the paint you can flatten them out with some heavy books (or have your husband/child/friend sit on them and then they can say that they helped!).
Once you get all the pieces together you'll have a lovely custom monogram to hang proudly in your house.
Easy as pie.

You may have noticed the blank wall space in the front hallway from the after photos (on the far side of the mirror beside the front door).
A bet you were wondering what I was going to put there. Or if you weren't before, hopefully you are now. I decided to use one of my pretty empty thrift store frames to create some custom monogram art for $0. That's right free.
Using this "junk"
I created this beautiful artwork.
This is something that anyone can do. All you really need is scissors, some paper and some paint.
Here's how I did it.
First you need to find a monogram that you like and print it out. I used a custom font that I found online, but you could use anything from Word or even draw it yourself.
Next you glue the print-out to the side of a cereal box (or some other stiff paper)
You want to put the glue on the "good" side and stick it to the colourful side of the box. This will make more sense in a second, basically you don't want to get glue on the "front" of the letter (which is the inside of the box).
Next you're going to cut out the letter.
This is more difficult the more swirly the letter, also my dollar store glue didn't stick that well and I had a bit of sliding around.but eventually you'll get something like this. Notice that I have separated the template from the cut-out letter ("cut-out"). If your glue is not too sticky like mine this is easy, if you have good glue you can just print 2 templates or photocopy a duplicate. You'll need this for the next step.
Now you'll need to cut out the loops. You can use an exacto knife and cut them out of the "cut-out", but its easier to cut them separately and gives a nice 3D effect at the end. When you're done you should have pieces like this.
Next we're going to cut out the background. I used a cardboard box and cut it to fit inside the frame so that it looked like this.
Now we're going to paint everything. I applied primer to all of the pieces.
And it got a bit messy.
Especially after I accidentally put my hand on the primer can lid while standing up... sigh.
Once everything is primed you can paint the pieces in whatever colours you like. I used the front hall wall colour for the background, trim white for the frame, white gloss for the "mat" and the "loops" and oil rubbed bronze for the "H". All colours I already had on hand. Once everything is painted you just have to assemble it. I used a glue gun for this for better hold. If any of your pieces curve a bit from the paint you can flatten them out with some heavy books (or have your husband/child/friend sit on them and then they can say that they helped!).
Once you get all the pieces together you'll have a lovely custom monogram to hang proudly in your house.

Linking up
Labels:
front hall,
how-to,
wall decor
April 20, 2011
Bathroom "Sketch" Art
I'm no artist, and I don't pretend to be, but that's something that I always wished I could do... draw. It's amazing to me what artistic people can do with just a pencil or paint. I was looking for some art to add to the powder room that would go with my Renoir print that has been my inspiration for the powder room. Seriously, he painted that. Amazing.
I wanted something simple and monotone like an etching or sketch. I hinted at this before when I told you about the paint colour for the bathroom. So I looked to my good friend Google to help me out with some ideas and stumbled across this really inspiring idea. It was perfect, but could I pull it off?
Step 1: Find and print out clip art pictures (from Microsoft Word or anywhere online) that you want to sketch (resize if necessary). I wanted to do 4 frames so I found a bathtub and toilet (similar to above) and added a sink and a roll of toilet paper (so cute!).
Step 2: Trace the clipart in pencil using "sketchy" strokes. You want the lines to be soft so that it looks like a real sketch. Add some shading... just follow the darker areas in the clipart and shade softly. Trust me, if I can do it, you can do it too.
Step 3: Sign your art. You can just do a squiggle, or sign your (or any) name or initials... no one will know!
Voila! Beautiful custom made art... for FREE. Can't beat that.
I have some amazing "after" pictures coming I promise. Painting the powder room is really taking WAY longer than we'd hoped. Looks like it will be FOUR coats of primer to cover that sponge painted madness.
![]() |
| Renoir's "Dance in the City" |
| From starterhometodreamhome.blogspot.com |
Step 2: Trace the clipart in pencil using "sketchy" strokes. You want the lines to be soft so that it looks like a real sketch. Add some shading... just follow the darker areas in the clipart and shade softly. Trust me, if I can do it, you can do it too.
Step 3: Sign your art. You can just do a squiggle, or sign your (or any) name or initials... no one will know!
Voila! Beautiful custom made art... for FREE. Can't beat that.
I have some amazing "after" pictures coming I promise. Painting the powder room is really taking WAY longer than we'd hoped. Looks like it will be FOUR coats of primer to cover that sponge painted madness.
Labels:
how-to,
powder room,
wall decor
March 16, 2011
Mirror Mirror on the Wall
Our front hall is looonnnng. 14 feet long to be exact and it needs some personality to avoid becoming a long boring corridor. We already added a bold paint colour and some molding to the walls to give it some drama, but I think we need more... and some sparkle and some more light.
I feel like you NEED a mirror in the front hall to "check" yourself before you leave the house. The other day I almost left the house with a big blob of spackle on my forehead. Don't ask me how it got there, I have no idea. Thank goodness I had to pee before I left and glanced in the powder room mirror. Although I was just going to Home Depot, I'm sure they've seen worse.
In our old house we had mirrored closet doors on the front closet like these
| Kingstar sliding mirror doors |
They added a lot of light to the room. Also Teddy (my schnauzer) would play with "the dog in the mirror" which was too cute for words. I'd like to install them again in the new house if budget permits... right now we're stuck with these monstrosities. Please excuse the mess and ignore the green paint, this picture was taken before our painting marathon.
I already decided that I wanted a HUGE mirror for the long wall (on the left in the photo above). Well the mirror I had in mind is big and round and a bit traditional without being too ornate. After a long time of searching, and having nothing but Goldilocks dissapointment (too big, too small, to shiney, too square), I saw this baby...
| Hudson Mirror from Bombay & Co |
Hello Drama!
This mirror really spoke to me and it said, "I am perfect. Oh and I'm on sale for 50% off... BUY ME". So I did. At $200 (after 50% discount) this mirror was still a big splurge, but because it is so large and really perfect for the space, I think its worth the investment. Plus we'll be taking it with us if we ever sell the house. I think I'm still on a 50% off high... gotta love a good sale.
Do you have a mirror in your front hall? Score a great deal lately?
Labels:
front hall,
wall decor
Subscribe to:
Posts (Atom)