Showing posts with label how-to. Show all posts

June 6, 2011

Why I am the Queen of Caulk

So I mastered the caulk gun.  Thank goodness since I already bragged to you about how I was going to be "so good at it".  Famous last words, but thankfully I was (and modest too!).

This tool, which looks like something found at your doctors office (enough said) is amazingly easy to use.  Here are my tips to a perfect application.  Oh and if you still doubt me, hubby said I did a better job than he did.  Bam!  Stamp of approval.

First you grab a tube of caulk.  We used this one because it is paintable and it cleans up with just soap and water.


Then you cut the tip off on an angle (you want the hole to be fairly small). 
These two details are important to getting a manageable amount of product coming out so that its not flowing everywhere.


Once the tip is removed you can load the caulk into the gun.  To do this, pull the trigger all the way back and load the caulk tube bottom first.  The top should slide in perfectly.  If it doesn't fit, you didn't pull the trigger all the way back.  It should look like this now.

Then you pump the trigger (this is starting to sound vulgar) to get the flow started.  Make sure you are set up when you do this because once it starts, it tends to keep flowing and you could end up with a big mess.


If you need to stop, or you start to panic, just hit the "escape hatch" button (above).  This will release the tension on the tube and stop the flow.  This was my best friend as I tended to panic a bit until I got the hang of it.  Once you get the general operation down you're going to apply it to the wall like so.  Hold on an angle and pull the gun towards (not away from) your body.

 Next take a damp rag and wipe your new caulk line (while its still wet) to remove the excess.  If you cut your hole too big you will have a lot of excess.

When the excess has been removed you can wipe it gently with your finger to smooth the line.

If you have not used the entire tube and you want to save it for future use you can put the cap on the caulk gun (you have to buy these separately) to keep it from drying out.

Voila!  Perfect every time. 

I promise that if I can do this, you can too.  Promise.  Cross my heart.

May 20, 2011

Beautiful Window Glass Makeover on a Budget

So I was at HD shopping for wooden blinds and I was like "They cost HOW MUCH?!".  Man, that is not happening ($400-$800 in case you were wondering).  I'm not putting ugly aluminum blinds in my pretty dining room, which is about all I can afford ($200).  I also like the bamboo shades, which are pretty affordable, but not formal enough for the look I want.

Then I saw it.  It was like some enchanted evening and I spotted it across the crowded room (name that movie/play).  It was perfect!  A beautiful glass pained window.  Are you ready?

Amazing!  I know, the perfect amount of elegance, privacy and very clean and crisp.  How did I afford to change out the glass of the windows when I couldn't afford blinds?  Its not new glass!  It is a film that is applied to the windows.

Here's the low down.  For $60 ($30 for each 2'x3' film) I transformed the window with just water and about 5 minutes of my time.

Sorry I don't have an pictures of the process, honestly, it took like 5 minutes or less and was SUPER easy.  It comes with really good instructions.
Here's the low down on how you do it:
First you remove the film from the package and trim to fit your window, you can cut it easily with regular scissors or a utility knife (I used scissors).
Next you spray the window with water (hint: I found that the more water the better because then I could slide it around to get it perfectly into place).
Then you take the backing off the film and position it on the window.
Using the squeegee (fun word!) that is included with the film you smooth it out and remove any bubbles (you may want a towel here to absorb the water that will squish out, I just squished it all out and then wiped it up afterwards).
Voila!  Brand new window, easy as pie.

The best part is that the film is removeable.  If you put it on crooked (which may or may not have happened on my first attempt) you can simply remove the film and try again, or slide it into the right position if you've put enough water underneath it.  This of course means that you can remove the film at any time and reuse it somewhere else.  It's not sticky like a sticker, just clingy like plastic wrap, except plastic wrap hates me and always sticks to everything, and the window film is awesome and made my day.

It looks so real that you can't even tell until you actually touch the window.  We've already fooled a bunch of people into thinking that it is real leaded glass.  Amazing!

If you decide to check it out for yourself the brand I used is called "Light Effects" and the pattern is called "Vienna".  They have lots of options including some funky coloured stained glass ones for if you wanted even more privacy or to conceal an ugly exterior view, like if your window looked out into an alley or a brick wall. 

Window before beautification
And now

May 16, 2011

Free Monogram Art

I love monograms.  My new (married) initial is H and it makes a great monogram, either lovely and scrolly or strong and straight.  Love it.

You may have noticed the blank wall space in the front hallway from the after photos (on the far side of the mirror beside the front door).
A bet you were wondering what I was going to put there.  Or if you weren't before, hopefully you are now.  I decided to use one of my pretty empty thrift store frames to create some custom monogram art for $0.  That's right free.

Using this "junk"

 I created this beautiful artwork. 
This is something that anyone can do.  All you really need is scissors, some paper and some paint.

Here's how I did it.

First you need to find a monogram that you like and print it out.  I used a custom font that I found online, but you could use anything from Word or even draw it yourself.

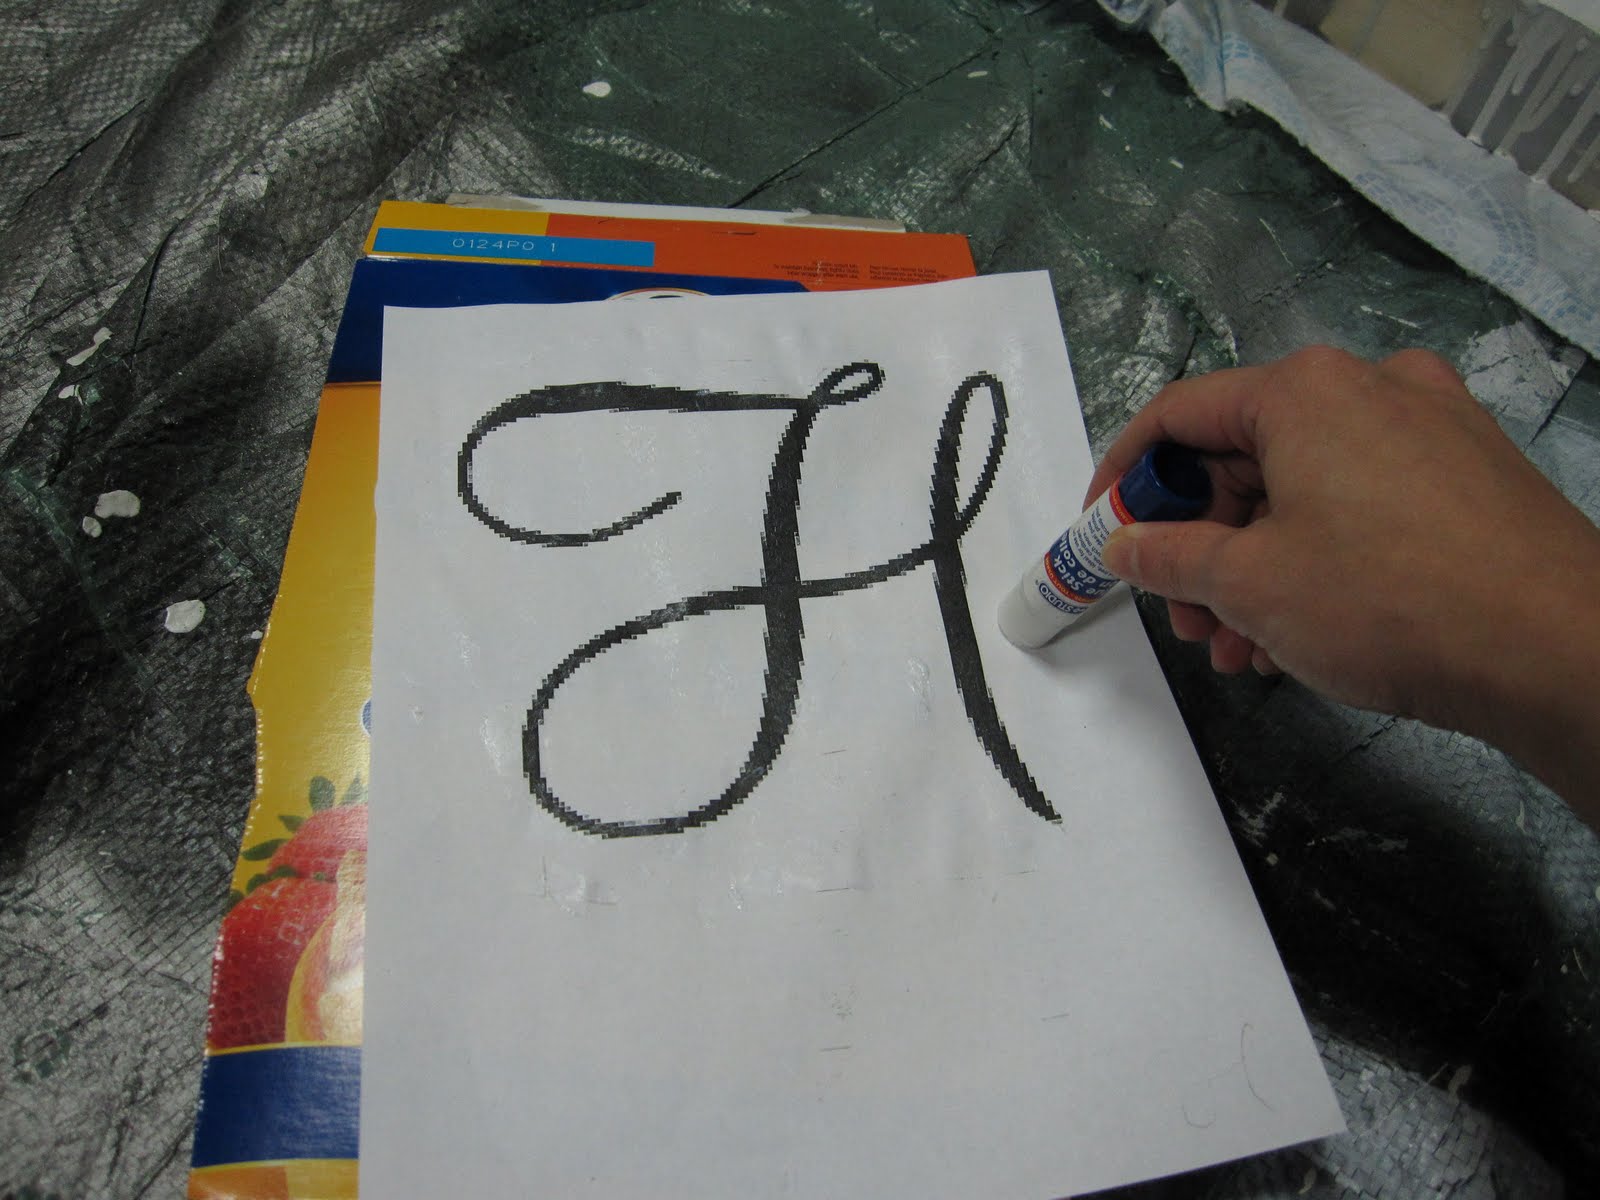
Next you glue the print-out to the side of a cereal box (or some other stiff paper)
You want to put the glue on the "good" side and stick it to the colourful side of the box.  This will make more sense in a second, basically you don't want to get glue on the "front" of the letter (which is the inside of the box).

Next you're going to cut out the letter. 

This is more difficult the more swirly the letter, also my dollar store glue didn't stick that well and I had a bit of sliding around.but eventually you'll get something like this.  Notice that I have separated the template from the cut-out letter ("cut-out").  If your glue is not too sticky like mine this is easy, if you have good glue you can just print 2 templates or photocopy a duplicate.  You'll need this for the next step.
Now you'll need to cut out the loops.  You can use an exacto knife and cut them out of the "cut-out", but its easier to cut them separately and gives a nice 3D effect at the end.  When you're done you should have pieces like this.
Next we're going to cut out the background.  I used a cardboard box and cut it to fit inside the frame so that it looked like this.

Now we're going to paint everything.  I applied primer to all of the pieces.
And it got a bit messy.

Especially after I accidentally put my hand on the primer can lid while standing up... sigh.

Once everything is primed you can paint the pieces in whatever colours you like.  I used the front hall wall colour for the background, trim white for the frame, white gloss for the "mat" and the "loops" and oil rubbed bronze for the "H".  All colours I already had on hand.  Once everything is painted you just have to assemble it.  I used a glue gun for this for better hold.  If any of your pieces curve a bit from the paint you can flatten them out with some heavy books (or have your husband/child/friend sit on them and then they can say that they helped!).

 Once you get all the pieces together you'll have a lovely custom monogram to hang proudly in your house.


 Easy as pie.


Linking up

HookingupwithHoH

April 20, 2011

Bathroom "Sketch" Art

I'm no artist, and I don't pretend to be, but that's something that I always wished I could do... draw.  It's amazing to me what artistic people can do with just a pencil or paint.  I was looking for some art to add to the powder room that would go with my Renoir print that has been my inspiration for the powder room.  Seriously, he painted that.  Amazing.

Renoir's "Dance in the City"
I wanted something simple and monotone like an etching or sketch.  I hinted at this before when I told you about the paint colour for the bathroom.  So I looked to my good friend Google to help me out with some ideas and stumbled across this really inspiring idea.  It was perfect, but could I pull it off?
From starterhometodreamhome.blogspot.com
Step 1: Find and print out clip art pictures (from Microsoft Word or anywhere online) that you want to sketch (resize if necessary).  I wanted to do 4 frames so I found a bathtub and toilet (similar to above) and added a sink and a roll of toilet paper (so cute!).
Step 2: Trace the clipart in pencil using "sketchy" strokes.  You want the lines to be soft so that it looks like a real sketch.  Add some shading... just follow the darker areas in the clipart and shade softly.  Trust me, if I can do it, you can do it too.
Step 3: Sign your art.  You can just do a squiggle, or sign your (or any) name or initials... no one will know!

Voila!  Beautiful custom made art... for FREE.  Can't beat that.

I have some amazing "after" pictures coming I promise.  Painting the powder room is really taking WAY longer than we'd hoped.  Looks like it will be FOUR coats of primer to cover that sponge painted madness.

April 7, 2011

Fighting "The Fear" of Design

I think a lot people have trouble designing a room because they are afraid of making a mistake and they don't know where to start.  I know that I still suffer from "The Fear" sometimes even after designing a bunch of rooms that turned out great (well, we like them).

Here's what I do to get started and maybe it will help you to get started on something that you've been unsure of what to do.

1. Pick something! 
I read somewhere that if you choose things that you LOVE for your home they will naturally go together and make your house feel homey.  This makes sense to me in some ways because your home should be a reflection of you and you should love your home.  On the other hand, your tastes can vary between different styles and of course there is the budget to consider... that said, I always start a room with something that I love.  The best part is that this should be easy, you know what you love.  You don't have to know how it will work right away, just one step at a time.

For the family room, we have that huge sectional that we love.  I knew that I needed to work it into the design.  For the front hall it was the wainscoting in crisp trim white.  For the dining room it will be the curtains that my mom gave me as a housewarming gift for our first house.  For the living room it will be a pillow that I fell in love with.  Now that you have decided on something you can work from there.

2. Consider existing elements
Now that you have something you love, your room is off to a great start, but its important to take the elements that are not changing (flooring, fireplace, doors, cabinets, etc) into consideration.  For our family room we had the fireplace and the bulkheads from the duct work to work around.  We took colours from the brick around the fireplace (browns, reds, charcoal grey) and used them in the room.  We also managed to build shelving to incorporate the bulkheads and make them part of the room.  Working with existing elements is important to making everything work together.  If you are in an apartment where you have things that you cannot change, this is especially important.

3. Determine the "mood" of the room
How do you want to feel when you're in that room?  For the family room we wanted something fun, bright and sophisticated; we didn't want it to feel like a basement.  Since the sofa is dark, we decided that the walls and the flooring should be light (for a brighter feel).  Once you choose the paint, flooring and a major item in the room, other things will be easier to choose and will come together more naturally.

Overall in a room you are trying to find balance; you want both light and dark, both solid and pattern, both wood and fabric.  Remember that paint is easy to change, pillows are replaceable, art can be changed, reframed, and things can be returned if they don't work.  Don't be afraid to make a mistake, you'll never have a room that you LOVE, if you don't try.

April 4, 2011

Kitchen mini-makeover

So eventually we plan to redo the kitchen… I just need to keep watering that money tree I planted in the backyard.  Seriously though, it’s not the ugliest kitchen in the world, but it does need a little help.  There is a LOT of green, and I hate the layout.  Corner cabinets with plastic lazy-susans instead of shelves are like a bad joke in kitchen-storage-land (this is a mythical place that I would like to live).

To make the kitchen livable for now, we changed the knobs.  Seriously, this simple thing made such a huge difference!  With our new furniture and counter accessories the whole room looks so much more updated and modern.  Now I just have to figure out something creative to tone down all that green!

Steps:
  1. Count how many knobs you need
  2. Purchase new knobs – make sure you shop around, knobs can be expensive, also pay attention to the size of the knob and the placement on your cabinets.  If you want to swap out knobs for handles you’ll have to drill an additional hole in your cabinets for the 2nd screw… also this adds a complication for the drawers since the knob holes are centered.
  3. Remove old knobs – you will need a screwdriver for this… I used a drill to make it faster, but inside the drawers can be a bit tight and you may have to do it the old-fashioned manual way.
  4. Install new knobs – same as step 3 only in reverse
  5. Voila!  Brand new kitchen!  Well... "newer" looking kitchen, I suppose.

Here is what my kitchen looked like before...
and after...
 Whew!  Still a mess!  Please don't judge me for my messy kitchen.  But don't the knobs look great!

 Here's a close up of the old knobs.

 And the new ones.
So pretty!  These knobs were discontinued so I got a great deal on them from HD online.  For about $100 I got all 35 knobs (plus 3 extra - I bought all remaining 38 knobs because you never know!) and installed them all in about 15 minutes.

I think this is a great and inexpensive way to update your kitchen or a bathroom vanity or even a dresser! 

I have some big plans to paint the kitchen and get rid of the painted border.  I'm dreading the number of coats of primer that I will need to use to cover it.  That dark green is so persistent!  Wish me luck.

Linking up!
beforeAndAfterButton
  
HookingupwithHoH

March 28, 2011

Thanks for the List, Craig

So it seems that "used" is coming back "in" again.  Maybe it's the struggling economies and tighter budgets, maybe it's the environmental movement, but either way it's a good thing.  Since we have been looking for affordable, but good quality furniture for our new house I have been turning to sites like Craig's List and Kijiji for help.

One thing I have noticed is that some people can really use some help on how to post an ad for sale.  Some ads sit on there forever while some are gone the same day.  Sometimes admittedly it is the quality of the item, obviously the best stuff goes quickly, but then there are some good stuff that lingers.  Here are some tips I have for sellers to help get those unwanted items gone as quickly as possible.

1. Don't lump items together.  If I'm looking for a dresser I probably don't also want to see your couch and ironing board.  I especially don't want a "group price" for all 3 items.  This is just lazy unless the item is a set (like a bedroom set) or you're having a one day sale and want to list all the items available.
2. Use a good title.  I would say "6 drawer dresser" instead of "dresser" or better yet "solid walnut 6 drawer dresser"
3. Include the measurements.  This is a big pet peeve of mine.  If you don't tell me how large the item is, how will I know if it will fit in my car/house.  Try to include length, width and height.  If the dresser has a mirror include those measurements separately.
4. Include a photo.  I know this can be hard if you don't have a camera of your own, but borrow one from a friend or use a camera phone.  One bad picture is better than none at all.  Trust me.  If your ad doesn't have a photo you are asking people to drive all the way to your house to see the item and then decide if they want to buy it.  Some people (like me) will skip all posts without photos.
If a photo is really not possible, include as much detail in the description as possible.  Something like "Solid walnut 6 drawer dresser  48"L x 22" W x 26" H.  Dresser is Victorian style and has curvy legs about 6" tall and carved drawer fronts.  Drawer pulls are black.  Dresser has some small scratches on top and sides, but is in good condition"
5. Respond promptly to questions and requests.  It's a good idea to update the posting to include the answers to questions that are asked.

Hopefully if you use my 5 hints above you will be happily decluttering your house of unwanted items, saving the planet, and helping people in need of what you are offering.  It will have you saying, "Hey Craig, thanks for the list."

March 17, 2011

How To Finish the Molding Like a Pro

After you've done all the work to install your beautiful molding and made sure that it is level and square you'll want to make sure you take the extra steps to finish it off.  Trust me, this will make all the difference.

You'll start with molding with nail holes and some gaps in the corners (sorry I don't have a picture of this stage). 

First you'll want to sink the nails.  This sets them below the surface of the wood so that you can fill the hole left behind and make it look seamless.

Use a hammer
and one of these nail sinkers (not sure if this is the "technical" name)
If you use a nail gun to install the molding you can set the "depth" of the nails to be "sunk" already and you can skip this step.

Once the nails are sunk you need to fill the holes and you might as well do the corners while you have the spackle out.  In my experience filling the corners is the most important step to a seamless result, plus it hides any "Oopsies" and gaps.
I use just regular spackle like this
and my finger to apply (wash hands immediately after application).  You can wear gloves if you don't like to get dirty, but a finger works much better then a putty knife for this.

After filling the holes you will have something that looks kind of like this

A bit bumpy and rough.  To smooth this out you just have to sand it down.  I use a fine 220 grit sandpaper, which comes in big sheets like this
I cut the sheets into a small squares to make it easy to use.  You'll probably need a bunch of squares, just switch to a new piece when the one you're using gets "clogged" with paint/wood.  You'll know what I mean when you're doing it.

When you're done you should have something pretty like this.  Nice and smooth.
Now you're ready for a final coat of paint and you're done.  Since my wall and molding will be the same colour I didn't tape anything and just painted it free hand.  Also, I used a satin finish paint for the molding/wall because I don't like my trim too shiny, but I still wanted it to be easily wipeable.

I also got hubby to caulk around the outside and inside of the boxes to fill the gaps for an even more professional look, but I will plan to do this myself next time (there will be more molding!) and include a how-to for you.  I'm a bit intimidated by the caulk gun since it looks like a weapon or gynecological torture tool. 
But I stand by my "all women can use power tools (or non-powered tools) even the clumsy ones like me" statement.  I will master it and show you how you can master it too.

March 15, 2011

Molding - How to Install

So I was planning to write a post about how to put up molding, but I think I'll just defer to the experts on this one.  If you managed to survive my math calculations on how to get perfectly equal sized boxed on your wall then you're ready for the next step: putting them on the wall.  I recommend making a template, which for me was a 4" x 4" box (out of cardboard) that you can use as your "spacer".  It is much easier than trying to hold up the measuring tape and the molding and the nail gun (notice the 3 objects and only 2 hands).

You can see a great instruction sequence on hanging molding at House of Hepworths here (which I found after we hung all of our boxes - darn it) or follow Sarah at Thrifty Decor here (with videos).

Here are my top three tips for beautiful boxes:
1. Make sure you make the baseboards level with the earth (not level with your floor).  This will be invaluable when you are installing everything else.  Use a level and make sure the bubble is in the center and then nail those puppies up.  You may end up with a small gap under the baseboard, but its better than your whole wall looking crooked.  It goes without saying perhaps that starting at the highest point on the floor is a good idea here.
2. Install the baseboard first, then the chair rail, then the boxes.  This gives you a good reference point and will make your install WAY easier.  Once the baseboards are level you can use your template and that molding will go up like gangbusters.
3. Cut and install the bottom of the box last.  This piece is the one that you will notice the least (versus the top and sides), if you have any slight miscalculations in cutting you can hide them by cutting this piece slightly longer or shorter than the top so that you get a perfect fit.

Happy cutting and nailing!  Oh and just a quick shout out to me because I used a nail gun for the first time and no one died... or bled.  My husband MAY keep all power tools away from me because I tend to be quite a bit clumsy coordinationally challenged.  Yup, I just made that word up.  Coordinationally.  But all women can learn to use power tools, even us less than graceful ones.  Have you mastered any new tools lately?

March 11, 2011

Molding Planning the size of the boxes - How To

Since I am a self-proclaimed math nerd, there's no point in denying it, I have a math degree.  Nerd alert!  I thought I would share my number crunching fun with you.  Doesn't everyone love math?  Well, let this mathie help you out with planning your molding install.

Step 1 - Measure your wall.  Mine is 168" long x 96" high (8 foot ceilings)
Step 2 - Determine the height of your chair rail (from the floor).  For 8 foot ceilings about 36" is standard, for 9 foot ceilings you could do 42" (to the TOP of the chair rail).  If you have a table picked out, you'll want the chair rail to be a couple of inches higher than the table.  My table is 32" high so the BOTTOM of the chair rail will be set at 36".
Step 3 - Determine the height of your baseboard.  If you are not replacing it, just measure, otherwise pick your new baseboard.  Mine is 4.75"
Step 4 - Determine your spacing between boxes.  3" is standard, but I like a little more space in the front hall, I'm going to use 4" since my baseboard is tall, I can go a bit bigger.  (you could do anything from 2" - 5" but don't go larger than the height of your baseboard or it will look out of proportion).
Step 5 - Determine the height of available wall under the chair rail.  Simple math... here we go. 
Distance to bottom of chair rail (Step 2) minus baseboard height (Step 3) = 36"-4.75" = 31.25" this is the amount of wall space that you have. 
Step 6 - Determine the height of your boxes.  Now you'll have spaces at the top and the bottom equal to Step 4 which is 4" x 2 = 8" total.  So the box height is Step 5 minus 8" which is 31.25" - 8" = 23.25"

Whew!  Are you still with me?  We're almost there.  Now we need to determine how long to make the boxes.

Step 7 - Determine how many boxes you want.  This may be based on how large you want the boxes... do you want them to be tall or wide or square.  I like the look of an odd number better so I'm going with 5 boxes.
Step 8 - Determine size of boxes.  Total wall length (Step 1) minus spacers (Step 4 x Step 7) divided by number of boxes (Step 7) which is (168" - 4" x 5 boxes) / 5 boxes = 29.6"

If you don't like the size of the boxes you end up with you can change the number of boxes and recalculate or use varying widths for the boxes... some skinny, some wider in a pattern that you like.

We put up painters tape on the wall to mark out some of the boxes to make sure that we liked the look before we went out and bought all the molding.  I'd recommend at least drawing it out on paper before you start cutting, but that's just me, I'm a planner.

If you didn't follow that at all and need help or you have questions send me an email... I'd be happy to help.

February 25, 2011

Wallpaper Removal - How To

Our house has a ton of wallpaper.  I'm convinced that when this house was decorated in the 80s it was probably the height of style.  However, that leaves me with lots of scraping and sanding to remove the wallpaper, borders and sponge-painted textures from the walls.

Now that we've done a few rooms of wallpaper removal, here are my secrets...

First, remove baseboards and chair rail (if applicable). 
This is easily done using a crowbar (or you could use the back of a hammer) to pry the wood away from the wall.  Our chair rail was installed using nails only (no glue), so the surface was in pretty good shape after removal.  If you have glue... sorry... sand, sand, sand.


Wallpaper removal was a bit tougher… but very doable even for beginners.  Here’s what you need:

  1. large bucket (or spray bottle)
  2. large sponge
  3. wide putty knife (for scraping) - I use a 6" one
  4. hot water, vinegar
  5. patience!

Steps:
  1. Try to peel off the paper with your hands or using a putty knife (gently).  Some of our paper was two layers and the top came off easily by peeling it off, and the paper backing required the following treatment.  If your top layer does not come off with peeling start with Step 2.
  2. Fill bucket with hot water, add a big splash of white vinegar (or whatever you have).
  3. Wet the wallpaper by wiping it with the sponge, you want to make it very wet and allow the water to penetrate the paper.  Alternatively you could spray it with a spray bottle, but this can make the whole wall wet... your call.  I have found the spray bottle to be faster, but you may not have one on hand. 
  4. Wait – you have to wait at least 10 minutes for the water to loosen the glue.  If the paper does not seem any looser after 10 minutes wet it again.
  5. Scrape – if you have wet the paper enough and waited long enough it should come off pretty easily although you may have to rewet and scrape as you go.
  6. Have patience, this part is VERY time-consuming, but it will be worth it when you are finished!
Of course I realize that there are fancy steamers, etc out there.  But I removed all of our wallpaper for around $5 (the cost of the scraper and the vinegar) and some elbow grease.