Since I already showed you my curtains and the rug for this room, I'm guessing you have a pretty good idea where the colour direction is going. Blue and brown and cream. Very neutral compared to the front hall, but I'm hoping also very sophisticated.
The molding that we've planned for the dining room walls is also a lot more complex than the front hall molding and will require a lot more math, a lot more cutting, a lot more nail-hole-filling and caulking (boo) and obviously a lot more time. I'm going to use the caulking gun this time so watch out for my how-to on that, once I master it of course.
For the trim we're going to keep the wood for now, maybe forever. We love the look of it and the glass doors are so beautiful... I can't bear to change them. In the future if we open up the kitchen/dining rooms that may be a different story.
For the upper part of the wall we're going with Prelude a nice blue-gray from Behr.
For the lower part of the wall and the molding/baseboard we're going with Ocean Pearl (also Behr).
We still have some outstanding things to decide. We need a privacy idea for the windows, I was hoping for something other than sheers since I want a cleaner look. All the furniture is wood and pretty traditional so we'll have to find some ways to inject some more contemporary items. I don't want it to come out looking "old-persony". No offense intended to actual "old people".
We need to decide if we are keeping the light fixture. I already bought a replacement, but I'm not sure... what do you think of the current one?
We need something for the wall opposite the "balcony" and I'm thinking a mirror, but maybe something that we diy. It will need to be pretty wide and not very tall to fit nicely above the chair rail.
Whew! So that's the plan for the dining room almost complete. Time to quit yapping about it and get down to business.
May 18, 2011
May 17, 2011
Dining Room - The Plan Part 1
Since there are SO many elements in my dining room plan, I decided to divide and conquer here. In this post I'm going to talk about the existing elements in the room and existing furniture, etc that we will be using. In the next post we'll talk colours and go over some other exciting goodies.
The dining room looked like this when we bought the house (not our furniture, etc).
The plan is to remove the wallpaper and add molding to the walls (more on that later). We're going to change the layout and move the buffet to the other side of the room, I think this will really improve the flow. We have a buffet and china cabinet (wedding gifts) which will be going in here and we also have a hand-me-down table and 4 chairs that will be staying for now. Here's a preview. Can you see now why we needed new curtains?
The rug (pictured rolled up above) was a clearance purchase from Ikea and is one of my favourite items in the room and was the second inspiration item that I alluded to before. It's got a kind of oriental style pattern and is lovely soft wool. You can also see the inspiration curtains folded on the buffet (above).
I think its going to be beautiful! What do you think?
The dining room looked like this when we bought the house (not our furniture, etc).
The plan is to remove the wallpaper and add molding to the walls (more on that later). We're going to change the layout and move the buffet to the other side of the room, I think this will really improve the flow. We have a buffet and china cabinet (wedding gifts) which will be going in here and we also have a hand-me-down table and 4 chairs that will be staying for now. Here's a preview. Can you see now why we needed new curtains?
The rug (pictured rolled up above) was a clearance purchase from Ikea and is one of my favourite items in the room and was the second inspiration item that I alluded to before. It's got a kind of oriental style pattern and is lovely soft wool. You can also see the inspiration curtains folded on the buffet (above).
I think its going to be beautiful! What do you think?
Labels:
dining room,
plan
May 16, 2011
Free Monogram Art
I love monograms. My new (married) initial is H and it makes a great monogram, either lovely and scrolly or strong and straight. Love it.
You may have noticed the blank wall space in the front hallway from the after photos (on the far side of the mirror beside the front door).
A bet you were wondering what I was going to put there. Or if you weren't before, hopefully you are now. I decided to use one of my pretty empty thrift store frames to create some custom monogram art for $0. That's right free.
Using this "junk"
I created this beautiful artwork.
This is something that anyone can do. All you really need is scissors, some paper and some paint.
Here's how I did it.
First you need to find a monogram that you like and print it out. I used a custom font that I found online, but you could use anything from Word or even draw it yourself.
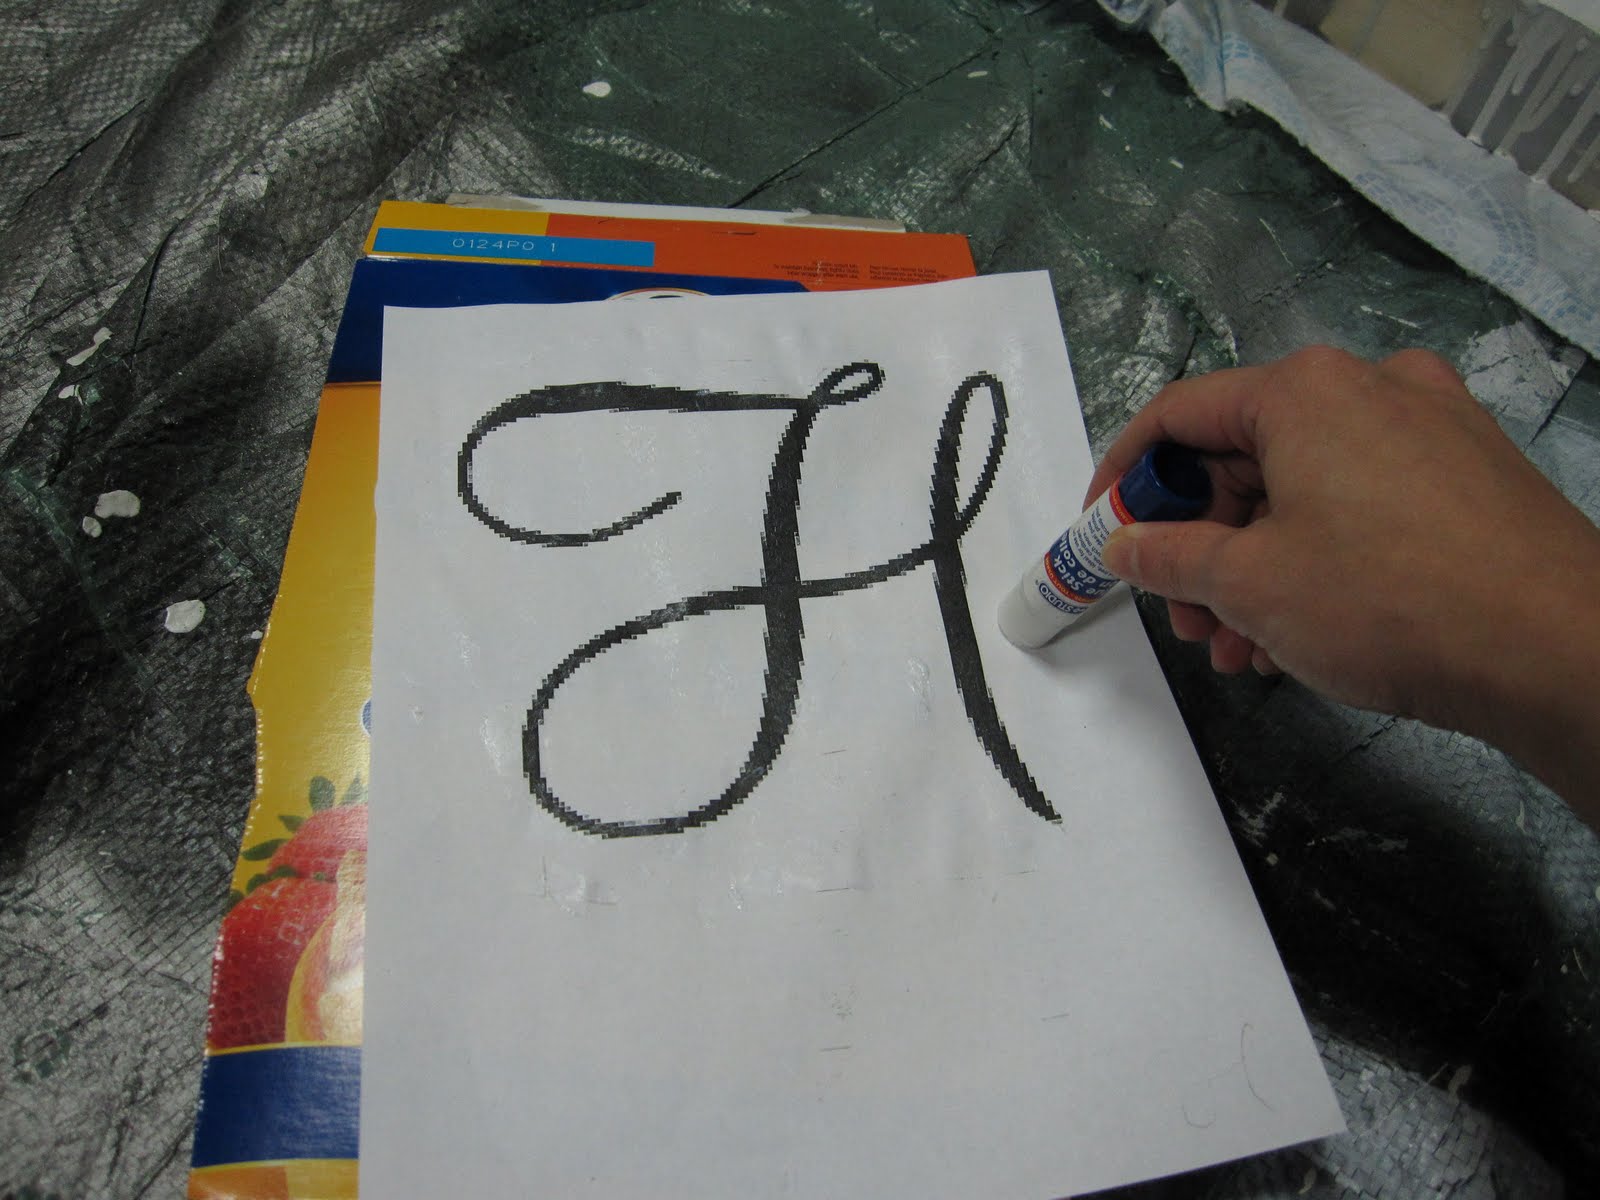
Next you glue the print-out to the side of a cereal box (or some other stiff paper)
Next you're going to cut out the letter.
This is more difficult the more swirly the letter, also my dollar store glue didn't stick that well and I had a bit of sliding around.but eventually you'll get something like this. Notice that I have separated the template from the cut-out letter ("cut-out"). If your glue is not too sticky like mine this is easy, if you have good glue you can just print 2 templates or photocopy a duplicate. You'll need this for the next step.
Now you'll need to cut out the loops. You can use an exacto knife and cut them out of the "cut-out", but its easier to cut them separately and gives a nice 3D effect at the end. When you're done you should have pieces like this.
Next we're going to cut out the background. I used a cardboard box and cut it to fit inside the frame so that it looked like this.
Now we're going to paint everything. I applied primer to all of the pieces.
And it got a bit messy.
Especially after I accidentally put my hand on the primer can lid while standing up... sigh.
Once everything is primed you can paint the pieces in whatever colours you like. I used the front hall wall colour for the background, trim white for the frame, white gloss for the "mat" and the "loops" and oil rubbed bronze for the "H". All colours I already had on hand. Once everything is painted you just have to assemble it. I used a glue gun for this for better hold. If any of your pieces curve a bit from the paint you can flatten them out with some heavy books (or have your husband/child/friend sit on them and then they can say that they helped!).
Once you get all the pieces together you'll have a lovely custom monogram to hang proudly in your house.
Easy as pie.

You may have noticed the blank wall space in the front hallway from the after photos (on the far side of the mirror beside the front door).
A bet you were wondering what I was going to put there. Or if you weren't before, hopefully you are now. I decided to use one of my pretty empty thrift store frames to create some custom monogram art for $0. That's right free.
Using this "junk"
I created this beautiful artwork.
This is something that anyone can do. All you really need is scissors, some paper and some paint.
Here's how I did it.
First you need to find a monogram that you like and print it out. I used a custom font that I found online, but you could use anything from Word or even draw it yourself.
Next you glue the print-out to the side of a cereal box (or some other stiff paper)
You want to put the glue on the "good" side and stick it to the colourful side of the box. This will make more sense in a second, basically you don't want to get glue on the "front" of the letter (which is the inside of the box).
Next you're going to cut out the letter.
This is more difficult the more swirly the letter, also my dollar store glue didn't stick that well and I had a bit of sliding around.but eventually you'll get something like this. Notice that I have separated the template from the cut-out letter ("cut-out"). If your glue is not too sticky like mine this is easy, if you have good glue you can just print 2 templates or photocopy a duplicate. You'll need this for the next step.
Now you'll need to cut out the loops. You can use an exacto knife and cut them out of the "cut-out", but its easier to cut them separately and gives a nice 3D effect at the end. When you're done you should have pieces like this.
Next we're going to cut out the background. I used a cardboard box and cut it to fit inside the frame so that it looked like this.
Now we're going to paint everything. I applied primer to all of the pieces.
And it got a bit messy.
Especially after I accidentally put my hand on the primer can lid while standing up... sigh.
Once everything is primed you can paint the pieces in whatever colours you like. I used the front hall wall colour for the background, trim white for the frame, white gloss for the "mat" and the "loops" and oil rubbed bronze for the "H". All colours I already had on hand. Once everything is painted you just have to assemble it. I used a glue gun for this for better hold. If any of your pieces curve a bit from the paint you can flatten them out with some heavy books (or have your husband/child/friend sit on them and then they can say that they helped!).
Once you get all the pieces together you'll have a lovely custom monogram to hang proudly in your house.

Linking up
Labels:
front hall,
how-to,
wall decor
Subscribe to:
Posts (Atom)